

Making a survival raft can be relatively easy, as long as you have the right materials on hand.
When you need to get from point A to point B by crossing a body of water, what do you do? Or, if you’re close to a body of water, and need a platform from which you can go spearfishing, what do you do?
The answer: figure out how to build a survival raft!
When major crap hits the fan, it helps to live near a body of water. Not only do you get a dependable source of hydration, you also get a steady source of protein as well as game that comes to drink the freshwater.
However, you’ll also need a method of transport in case you need to bug-out or if it floods over. And this is where your DIY raft comes in.
What You’ll Need
Before you begin to build a raft, you should have some cutting tools like a hand ax and a bushcraft knife at the very least. A handsaw is also useful, but you can use a machete to do all the heavy-duty cutting work.
A hammer and some nails are definitely welcome, but cordage like rope (nylon or hemp), paracord or tree roots will do nicely as well, as long as you have it in abundance.
Getting the Materials
Depending on your location and what’s accessible to you, the materials can vary. For the base of your homemade raft, you can make a log raft from fallen trees or bamboo.
If you live in a more populated area you could learn how to build a raft with pallets. Even a simple scrap wood raft could meet your needs, as long as it’s lightweight and buoyant.
Method 1: How to Make a Raft with Logs
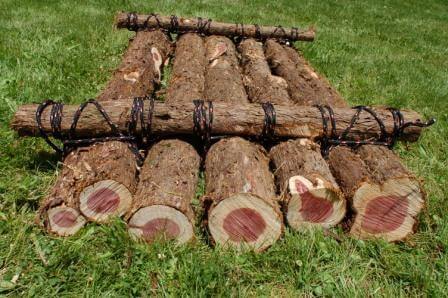
Gather at least 12 straight logs measuring 7 feet long with a diameter of at least 2 inches. If possible, the logs should be of the same length and thickness for stability and better buoyancy.
Ideally you should source these logs from dead, dry trees, as cutting live trees require that you dry the wood out, and that takes too much time. Be sure to check each log for rot or parasites before using them.
To put together your survival raft with logs, do the following:
Step 1. Cut off any protruding branches or twigs to ensure the logs are straight and uniform in shape.
Step 2. Arrange 9 of the 15 logs side-by-side close to the water’s edge; this makes it easier to “launch” the raft once completed.
Step 3. Once the logs are arranged, pair the remaining six logs — three on top and three on the bottom: one pair near each end and the third in the middle, “sandwiching” the nine logs as per the image below.
Step 4. If you don’t have a hammer and nails, lash the three logs to the other logs with paracord, rope, duct tape, tree roots or similar cordage.
Step 5. As an option, place and securely attach some flat planks of wood or a plywood deck for a more stable floor.
Step 6. Make a couple of oars, (see instructions below) then place the raft on the water.


Method 2: Wood Pallets
Wood pallets are an excellent base for your survival raft; they’re lightweight and offer a prefabricated base to work on.
Collect 4-6 wood pallets of the same size, depending on how many people you wish to transport. Pallets aren’t very buoyant, so you’ll need at least 6 empty 55-gallon plastic or steel drums with airtight lids and no holes to act as flotation aids.
Here’s how to make a raft with these materials:
Step 1. Lay out 4-6 pallets on the water’s edge, lashing or nailing them together.
Step 2. At the corners, lash an empty plastic/steel barrel. You can opt for 4 barrels, one on each corner, or 6 barrels – one on each corner, and another two in between them. Be sure that the barrels are empty and airtight to prevent the raft from sinking.
Step 3. Turn the raft over. Make a final inspection of the pallets, ensuring that they’re securely strapped or nailed to each other.
Step 4. Get your oars ready or make some (see below), then launch the raft.


Method 3: Bamboo
Possibly nature’s most versatile and useful plant, bamboo is strong, lightweight and easily modified. If you can get it, bamboo is one of the sturdiest and most buoyant materials you can use for building a raft, and requires little or no modifications.
Gather about 5-10 bamboo poles, about 6 feet in length and at least 2 inches in diameter. Be sure that their thicknesses and lengths are consistent to ensure buoyancy and stability in the water.
Cut the bamboo to uniform lengths with your ax or machete if necessary before building the raft.
Here’s how to make your raft:
Step 1. Arrange the bamboo poles together near the water’s edge.
Step 2. In the same way as the first raft described above, lash all the poles together with the cordage you have – nylon or hemp rope, tree roots or paracord.
Step 3. As an option, place and securely attach a plywood sheet or flat wooden planks of the appropriate size for a more even floor.
Step 4. Make a couple of oars if you don’t have any (see instructions below), then launch the raft.

Making the Oars
Your survival raft would be useless if you didn’t have a way to steer and paddle across the water, so you had best make some oars.
Get a couple of poles (bamboo, wood or PVC pipe) and tie securely a wedge-shaped plank of wood, or split bamboo. When sourcing the wedge, go for lightweight materials so your arms won’t tire easily when paddling. A pair of adult-sized swim fins lashed securely to the poles will do nicely as well.
Final Notes
Making a survival raft can be relatively easy, as long as you have the right materials on hand. The above tips are a tiny sample of how you can craft a useful survival raft.
Other materials like Styrofoam blocks, PVC pipe and empty plastic drink bottles are also viable options for your flotation components – the materials you use are limited only by your imagination and their immediate availability.
When making a survival raft, what matters most is that it delivers the bare minimum you need – it floats, holds together in the water and helps you survive whatever situation you’re in.