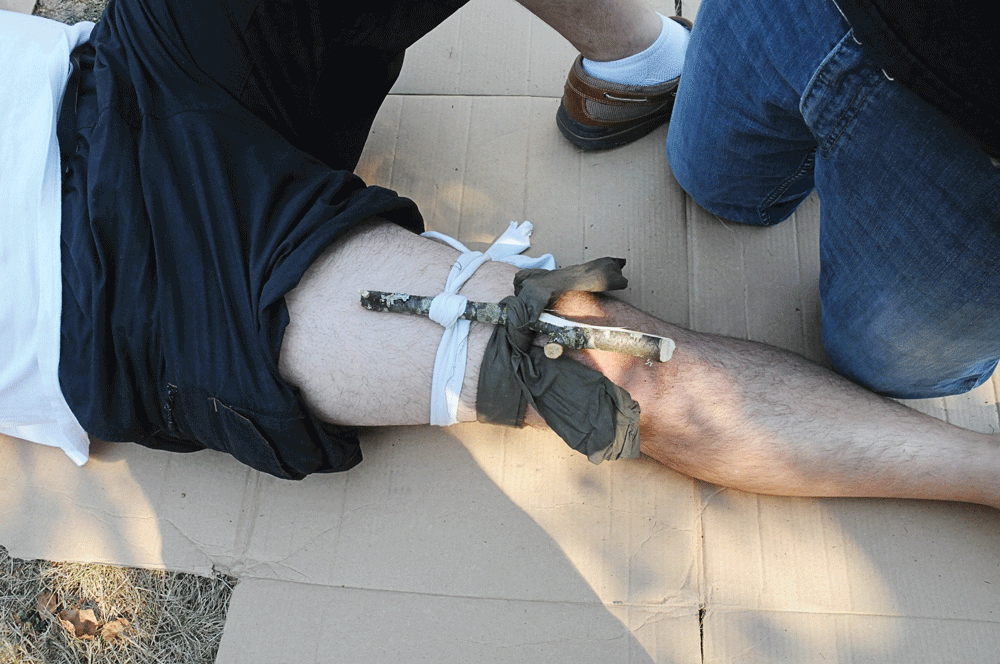
In the history of first aid, the simple tourniquet has probably saved more lives than any other invention. The device was known to Alexander the Great and continues to be used to this day to stop life-threatening bleeding. The situations and rules for tourniquet use are simple: Tourniquets are used only to control bleeding in the arms and legs in a last-chance effort to save the victim. Sad but true, there are cases where someone applied a tourniquet to someone’s neck to control bleeding from a head wound. That’s not going to end well.


Understanding the proper way to apply a tourniquet in the field is a skill worth possessing, as the likelihood you’ll encounter a life-or-death medical situation is quite high. Gareth Jones, a former U.S. Army combat medic, has gained more than enough first-hand experience with tourniquets during his tour in Iraq and explains that there is a rather simple approach to applying a tourniquet.
When confronted with a situation where the injury is severe enough that a major artery has been severed and you feel the only method that will save the victim’s life is a tourniquet, there are dozens of things that can be used to fashion one, from thick bootlaces, belts, and wide drawstrings to pack straps, electrical cords/wires, and ripped strips of cloth. Remember that you want to have a wide surface area, so a thin piece of string might cut into the skin; pad it with some cloth.


Once the tourniquet is in place, time is still critical to get the victim to a hospital. He or she is likely to have lost a lot of blood before you got the tourniquet on, and it is likely that the victim will go into shock. Even if you have controlled the bleeding, this is still a serious medical emergency. If phone service is available, call 911 immediately, and arrange transport to a proper medical facility.
Tourniquets will not cause the limb to “die” and have to be amputated; that is an old myth. Your limbs can go several hours with a tourniquet in place without long-term damage, but you can bleed to death in three minutes from a wound to your femoral artery.
To treat the shock from blood loss, keep the victim warm and lying down. Check them frequently for breathing and pulse rate—you’re hoping this will be as normal as possible. Signs of shock include rapid and shallow breathing, rapid and weak pulse, sweaty, clammy skin, turning blue, confusion, and passing out.
HIGH-TECH TOURNIQUET
CAT: Combat Application Tourniquet
If you want to be super-prepared, consider buying something like a reusable SOF Tactical Tourniquet or single-use Combat Application Tourniquet (CAT). These handy tools cost about $30 each. You can put one on an injured person in an instant, instead of wasting time tearing your shirt and looking for a stick. The windlass is attached to the strap and comes with its own rings or hook and loop for locking the windlass in place. Best of all, you can apply a pre-made tourniquet to yourself if you’re alone.


Maybe the most important thing you can do to be prepared for life-threatening bleeding is to get professional training in first aid. If you’re trying to remember the details in this article years from now when someone you love is bleeding out, that’s too late. The advantage of proper training is that it’s hands-on. You’re more likely to remember something you practiced than something you read about. But with that training and practice, you can be ready to save a life when the worst happens.
Editors Note: A version of this article first appeared in the January 2015 print issue of American Survival Guide.


