6 NIFTY KNOTS FOR THE BACKCOUNTRY
All right, let’s tie one on (these puns practically write themselves). If you were ever in the Scouts, you probably have some experience with these. As a lady, I was never in the Scouts; my knot experience comes from being a stagehand for a while.
But that’s one of the cool things about knots: Like numbers, they’re universal. You can be a fisherman, a stagehand, a Scoutmaster, a firefighter, a climber – the list is about as long as the catalog of knots you can learn. No matter the profession or hobby, a bowline is either a bowline or it’s not; you will know if you get it wrong.
Pklimenko / Dreamstime.com photo
Whether your occupation is among any of those listed or not, you came here because you love the outdoors. Every backpacker or serious outdoorsman should have at least a few knots in his repertoire. These are a few of the handiest ones to know when you’re out in the sticks.
KNOTTY TALK
Next time some grizzled sailor squints an eye at you while tying a knot, murmuring a mnemonic or walking you through his steps (what, you’re saying this hasn’t happened to you?), you’ll know just what he’s talking about.
Roman Hraška /Dreamstime.com photo
Bend. This is a type of knot used to join two lengths of rope.
Bight. This is the U-shaped bend in the rope and does not cross over itself. A knot that can be tied without using the working end (see below) is called a knot on the bight.
Hitch. This is a type of knot used to attach a rope to an object, such as a post, a ring or even another rope.
Loop. Like a bight, this is also a U-shaped bend, but here’s the difference: In a loop, the strands of the rope cross over one another, whereas in a bight they do not. There are open loops, closed loops and more, but the thing to remember is that a loop is more like a shoelace loop and a bight is more U-shaped.
Standing End. This is the end (or part) of the rope that is not active in the knot-tying.
Tail. This is the length of excess rope left over in the working end after the knot has been tied. Always leave sufficient tail after a knot so it doesn’t come loose.
Working End. This is the part of the rope that’s active in tying the knot and is opposite of the standing end. It’s sometimes called a running end.
1 BOWLINE
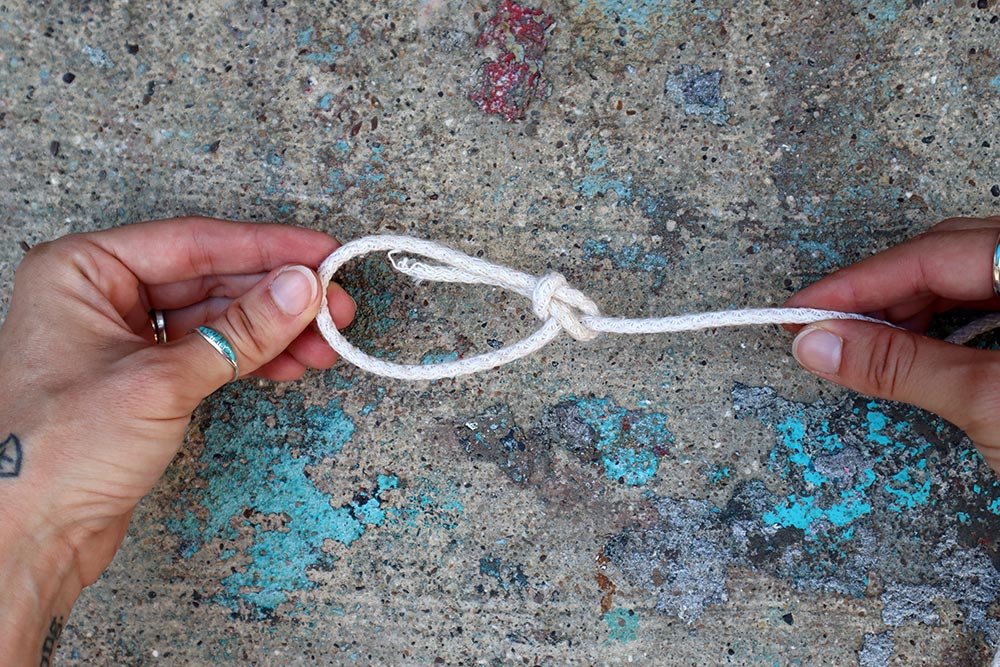
This ancient knot is my personal favorite and possibly the most essential knot you can learn. Sometimes called the “king of knots,” the bowline is a workhorse and exceptional at holding strong while bearing a load. It is used to make a loop at the end of a line that you can attach to an object or to another bowline. Another great thing about it is it’s easy to untie, even while bearing significant weight.
Why
Because it is extremely reliable under load, you can use this knot to bear weight on a pulley system (like you would when hanging a bear bag using the PCT method), in rescue (pulling someone up out of a hole) or when you need to join two ropes (especially if one of the ropes is bearing weight).
How
Step 1: Take the working end and loop it over the standing end, forming a P. You want to do this fairly close to the end of the rope so you don’t have too much tail.
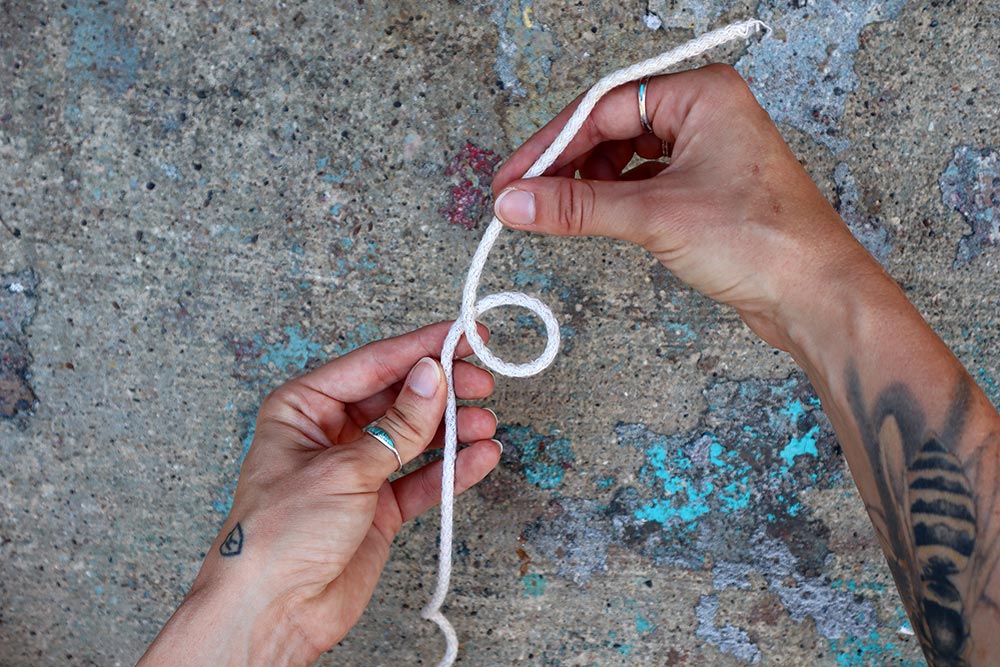
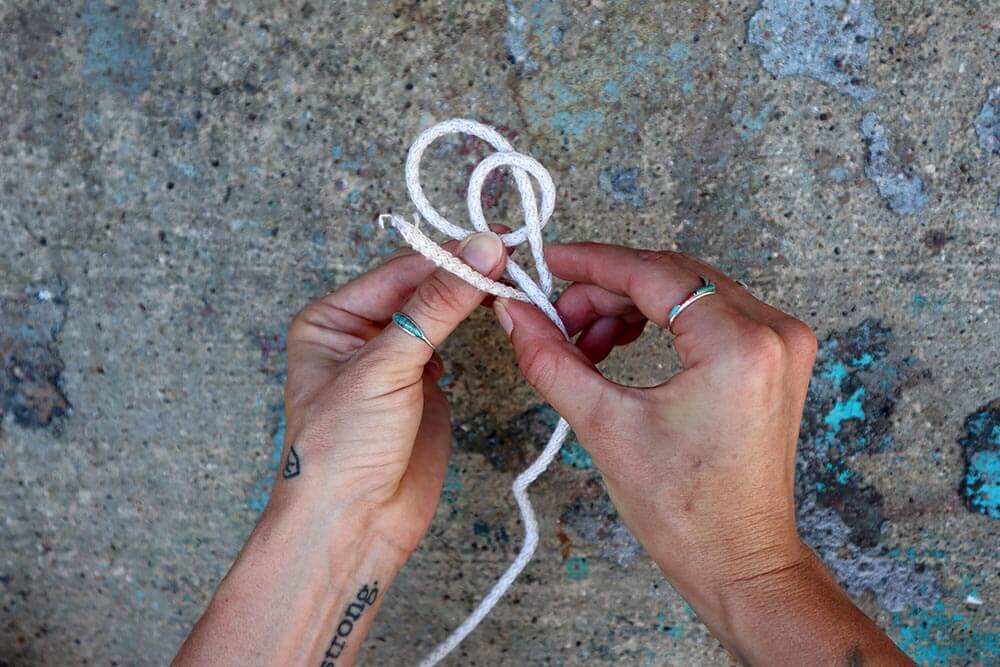
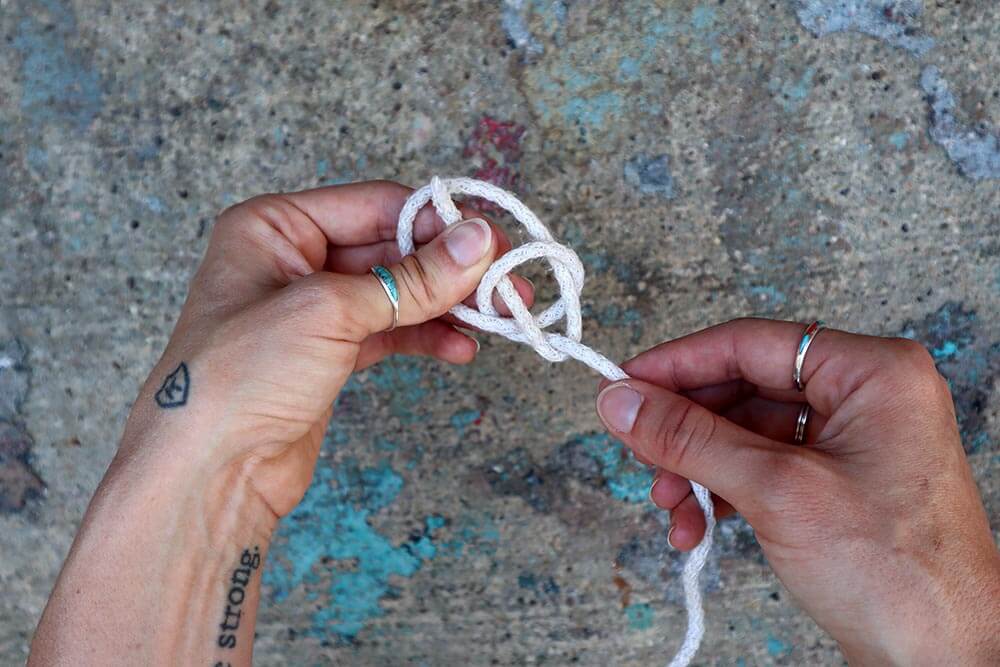
Step 2: Think of your working end as a rabbit, and the standing end as a tree. The rabbit comes out of the hole (working end comes up out of the loop from below), runs around the tree (working end comes out of the loop and passes under the standing end, right above the loop) then runs back down the hole (working end comes up and dives down into the loop).
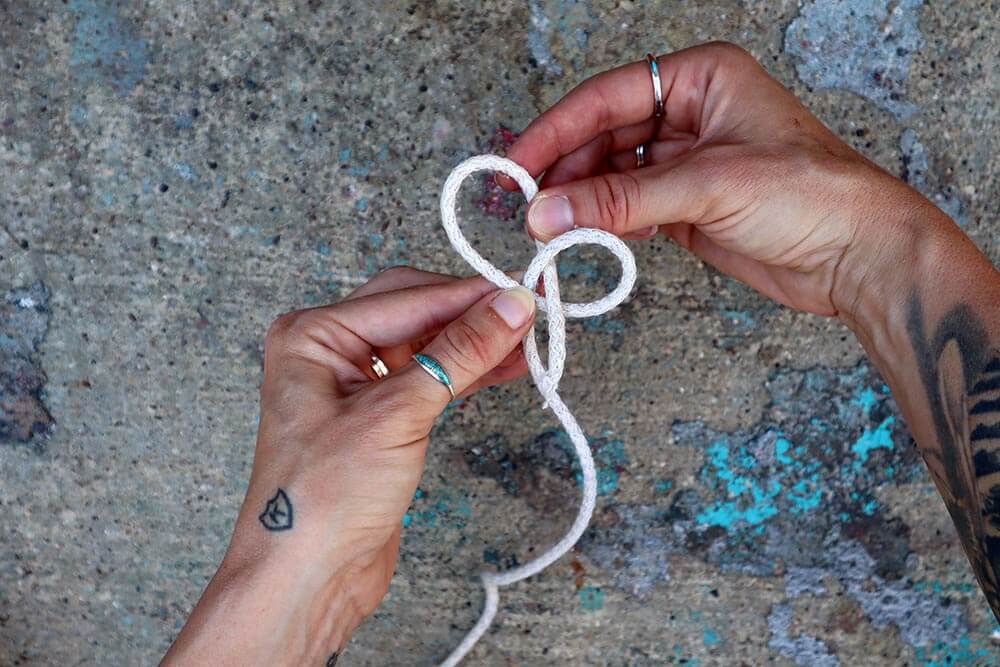
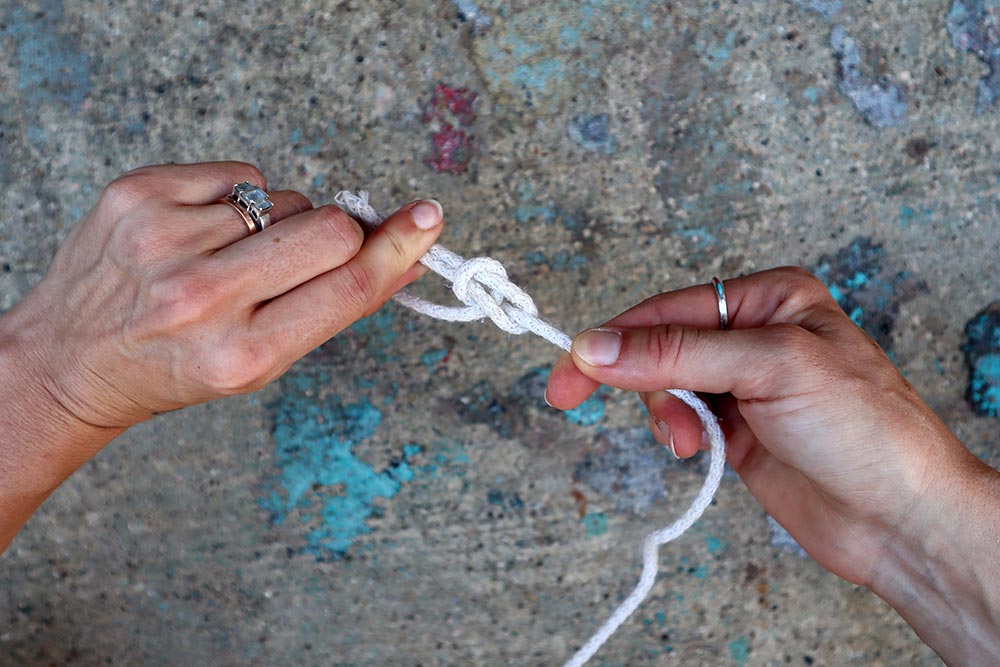
Step 3: Pinch both parts of the working ends together, grab your standing end, then pull it tight.
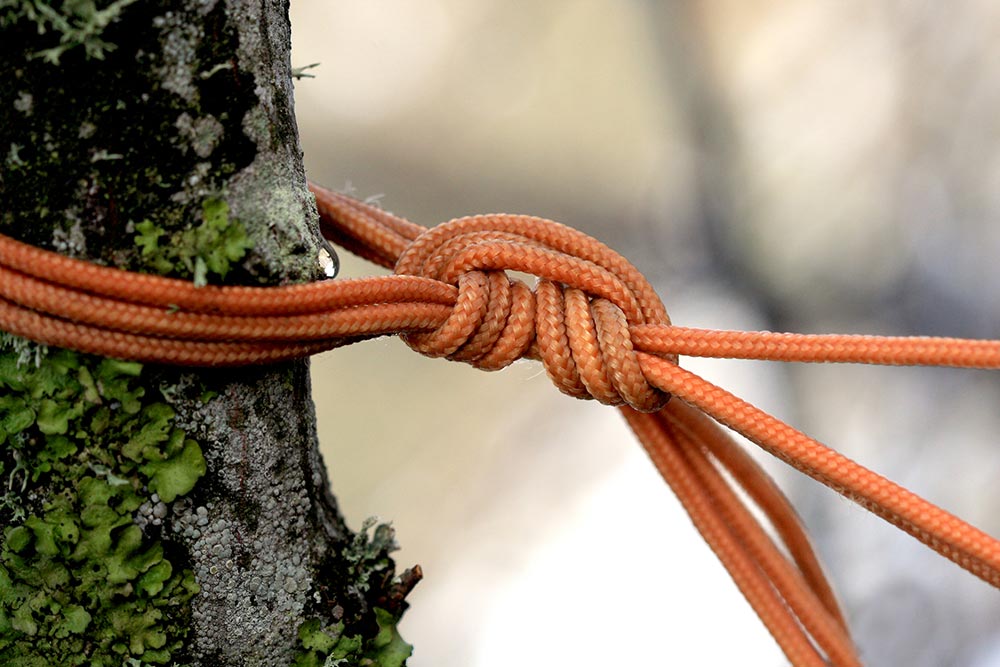
2 CLOVE HITCH
The clove hitch is among the top three knots you want to know, especially for outdoors activities. It’s a binding knot and is used to secure rope to an object, usually one that’s cylindrical, and bears a load well. This one is a bit tricky because it can undo itself pretty easily until it’s cinched tight, and usually needs an overhand knot (that’s the basic knot most everyone knows) to really make sure it’s locked in place (especially if the object it’s securing can twist or rotate).
Why
Use this one for anything that’s roughly cylindrical (though it could even be tied to something like a rock as long as it’s oblong enough). It’s perfect for tying to a tree (like when setting up a hammock, though you could also use a taut-line hitch for this), tying a horse to a post, tying to a carabiner or to the twig used in the PCT food-hanging method.
How
Step 1: Wrap the working end around your anchor (whatever pole or tree you’re tying to). Make sure you have enough slack to wrap around the anchor again.
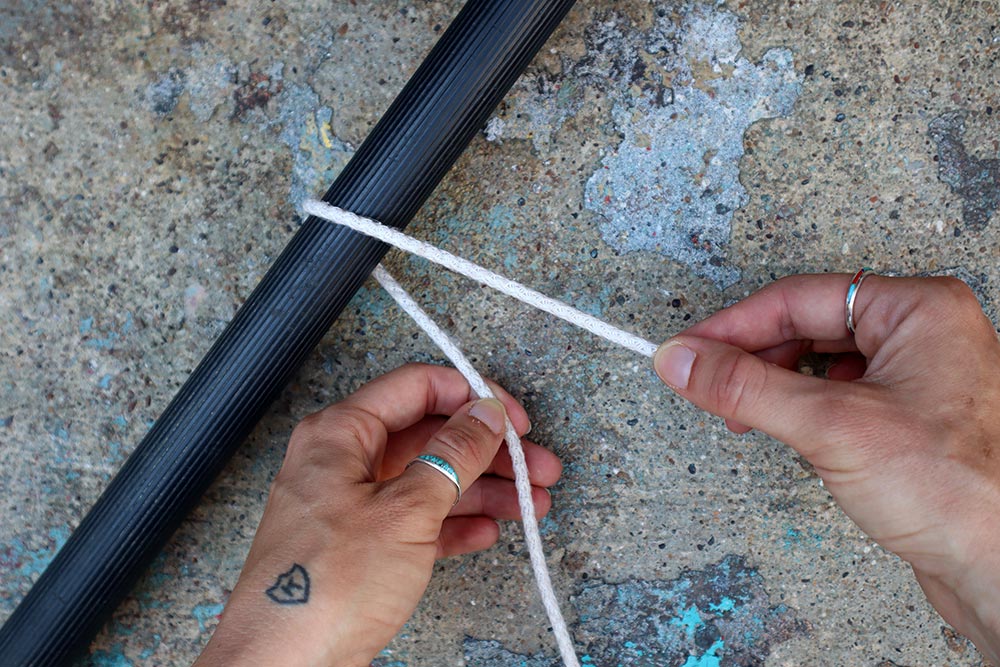
Step 2: Wrap that working end around the anchor a second time, crossing over itself to form an X.
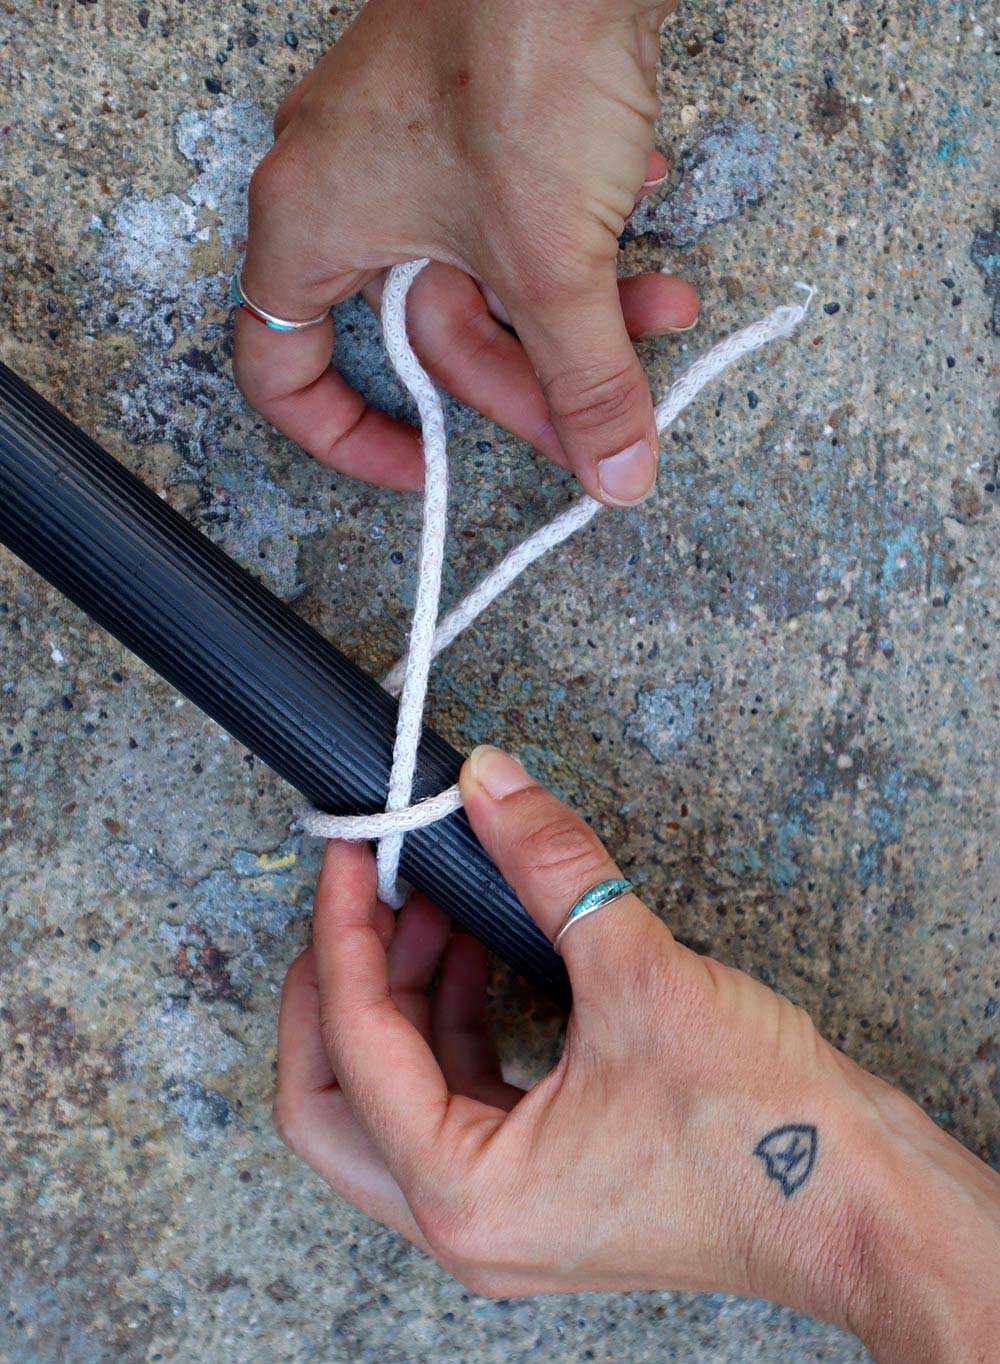
Step 3: Bring the working end around and thread it under the X you’ve made, pulling both the working and standing ends tight to secure the knot to the anchor.
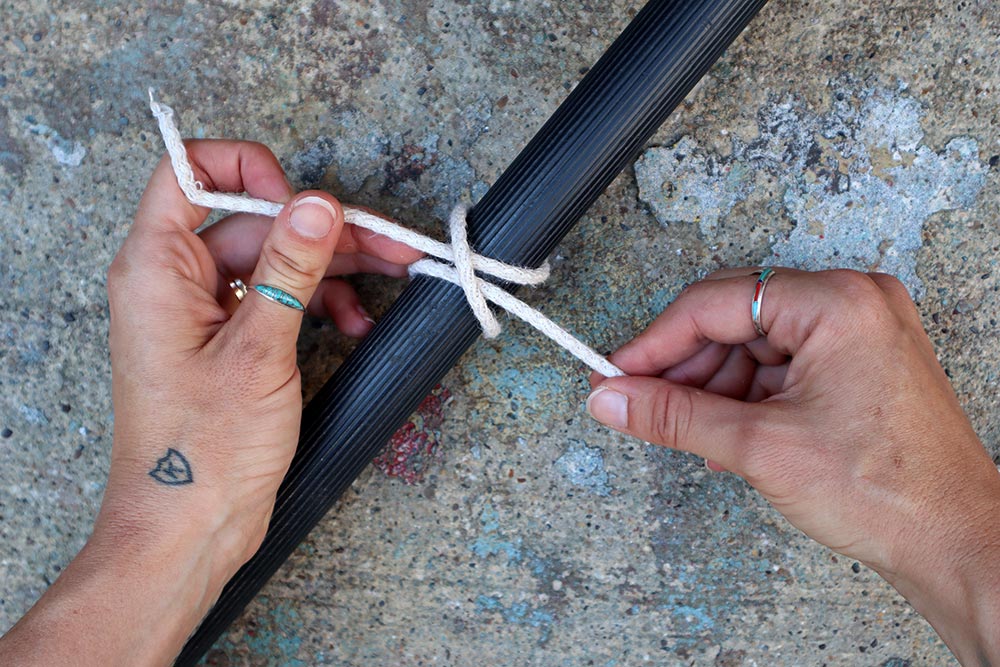
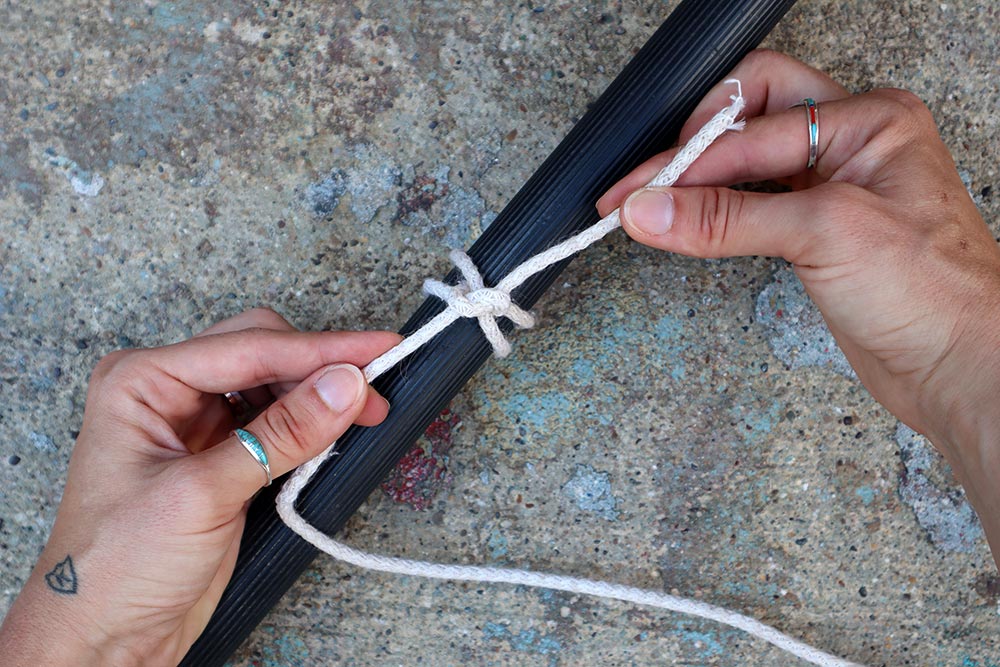
BONUS: The clove hitch will serve temporarily as is, but to make it more reliable and keep it in place, use the working end to tie an overhand knot over the standing line.
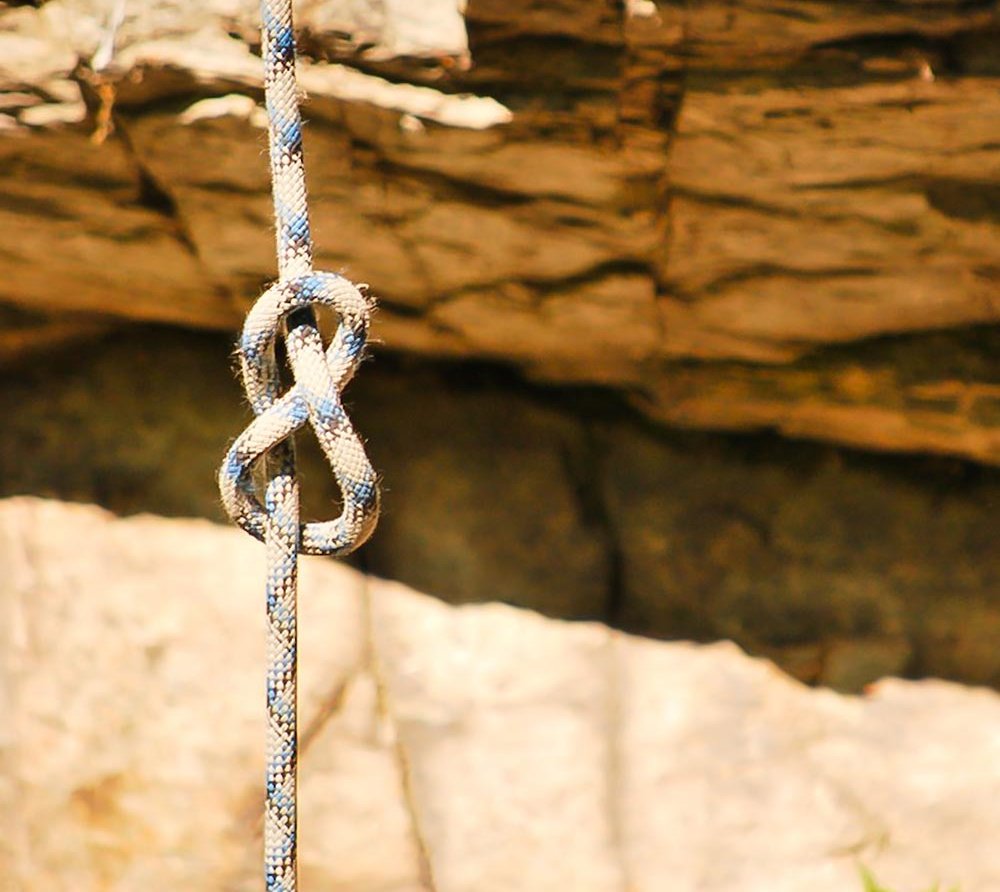
3 FIGURE 8
Sometimes called a Flemish bend, the figure-8 knot is one of the essentials for sailing due to its strength, versatility and non-slip nature. It’s generally used as a stopper knot and is easier to untie than an overhand knot. This is one you should know for its own applications, but the directional figure-8 variation is also necessary to know so you can tie a trucker’s hitch, which is coming up.
Why
If you’re a climber, you probably already use this and the double-figure-8 variation of this knot, but you can use the single-figure version around camp as a stopper for any reason (say your guy line comes free from its anchor and you want to keep the line from going through a grommet).
How
Step 1: Make a loop near the end of the rope and form a P, with the working end crossing over the standing end.
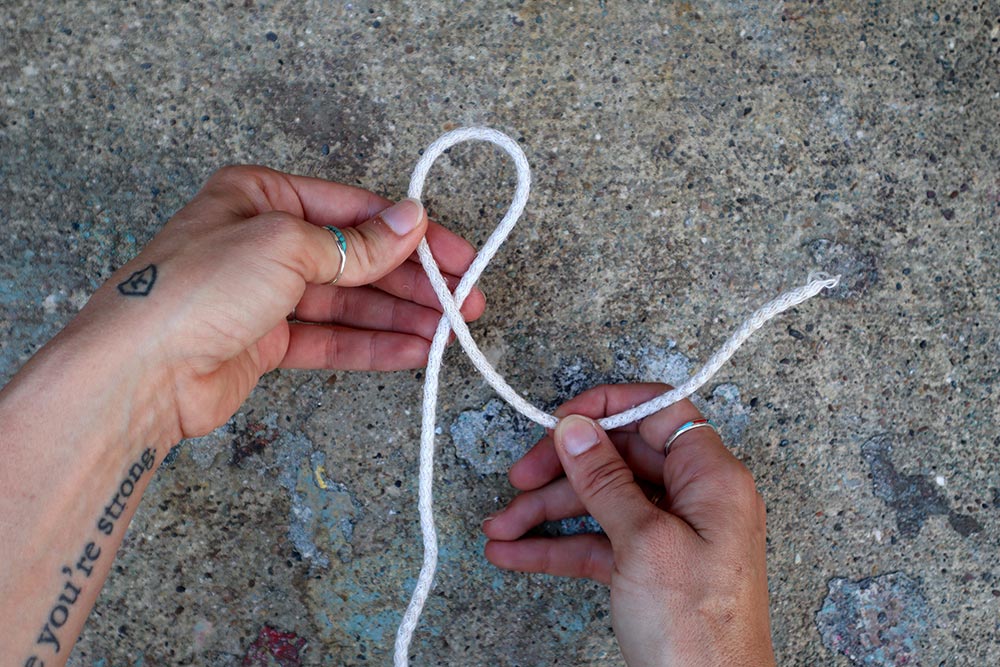
Step 2: Pass the working end under the standing end.
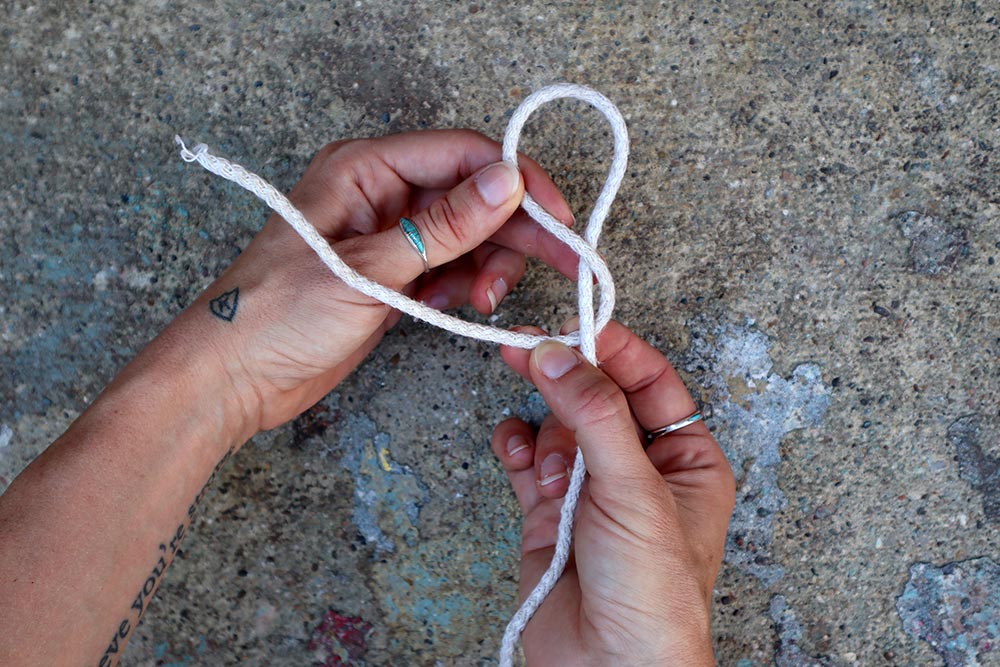
Step 3: Bring the working end over itself (the loop part) and then down into the loop, pulling both working and standing ends to tighten the knot.
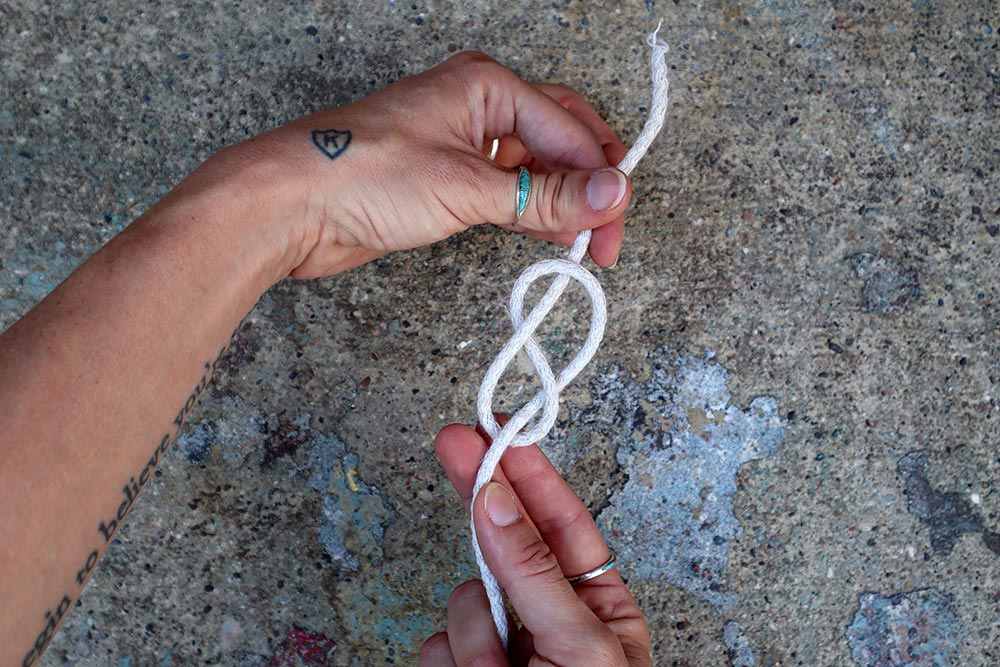
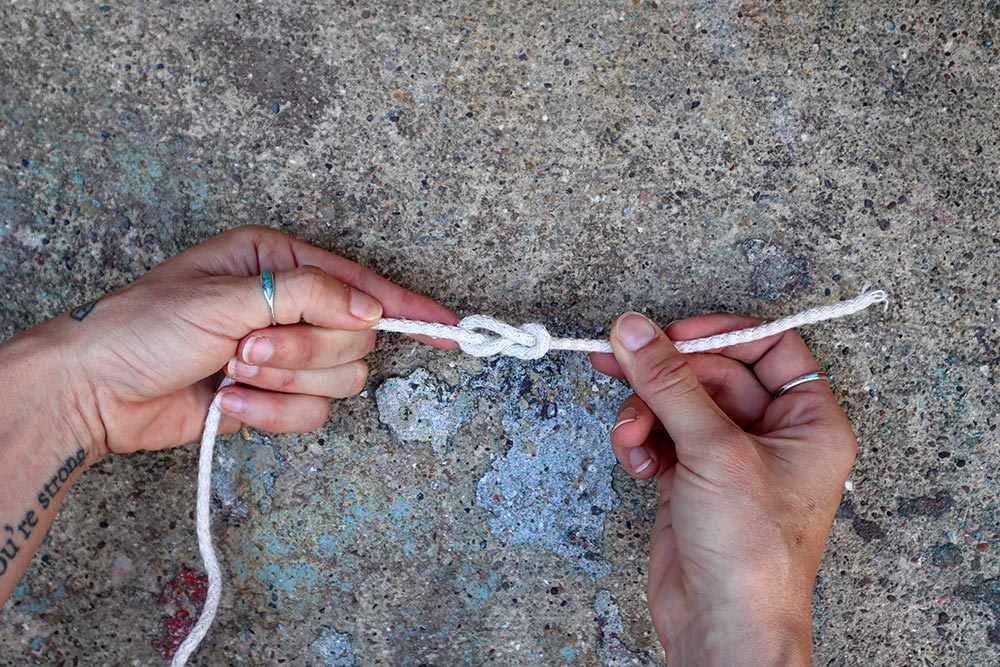
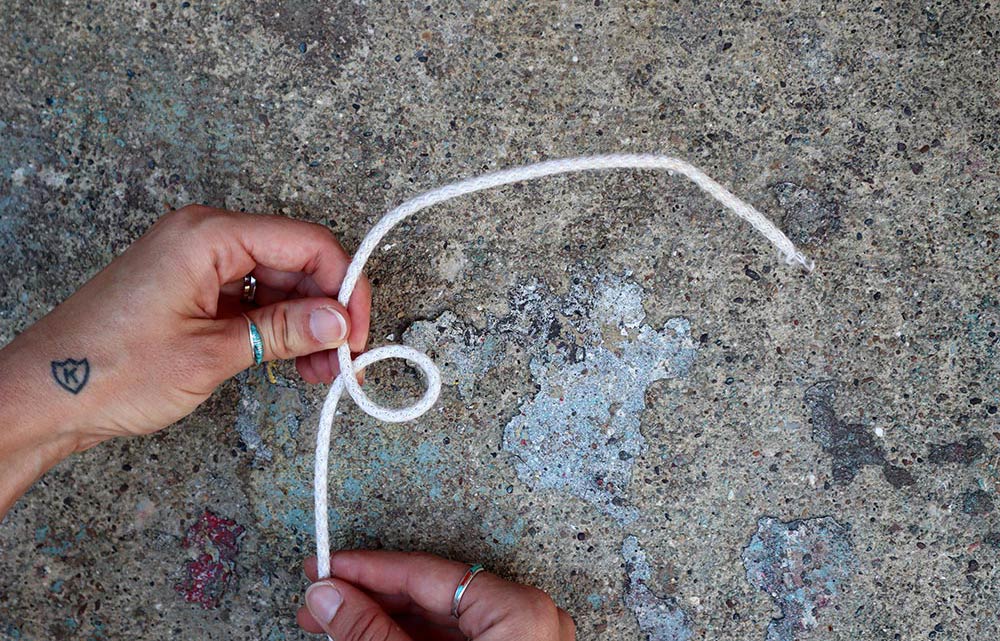
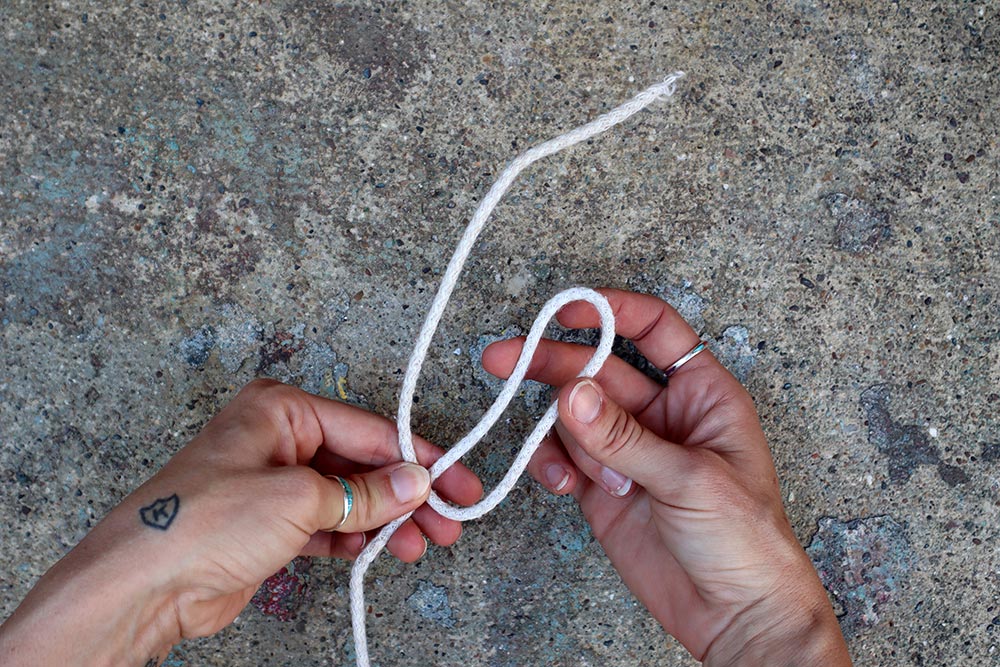
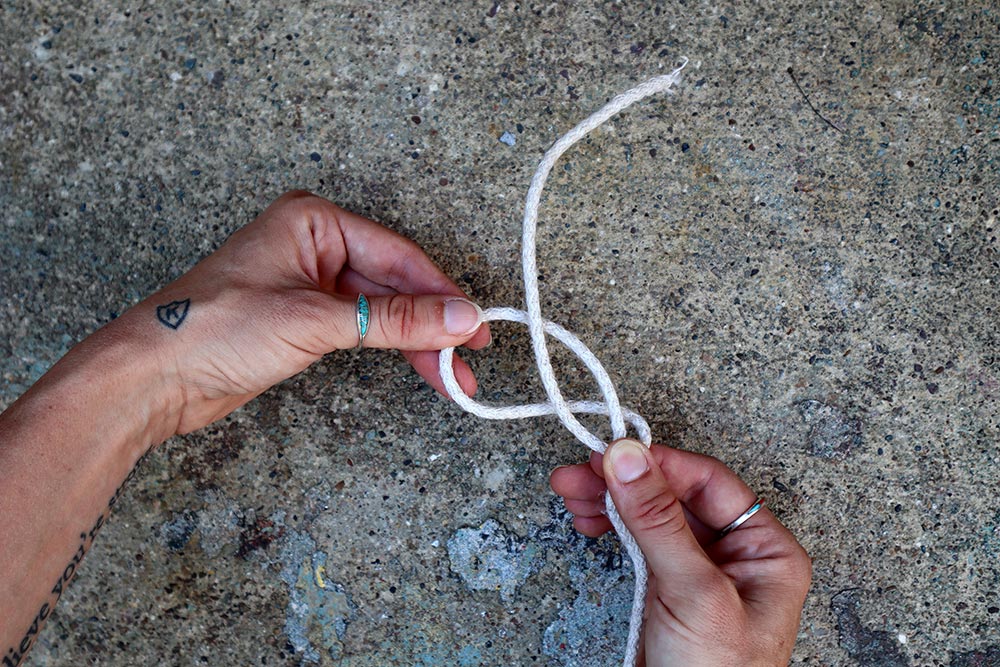
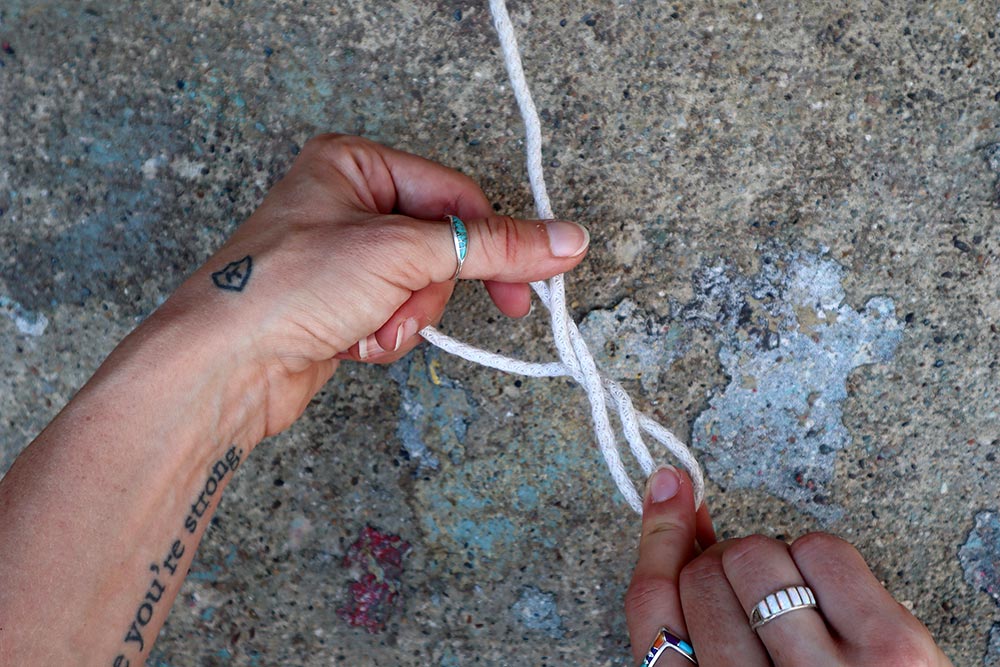
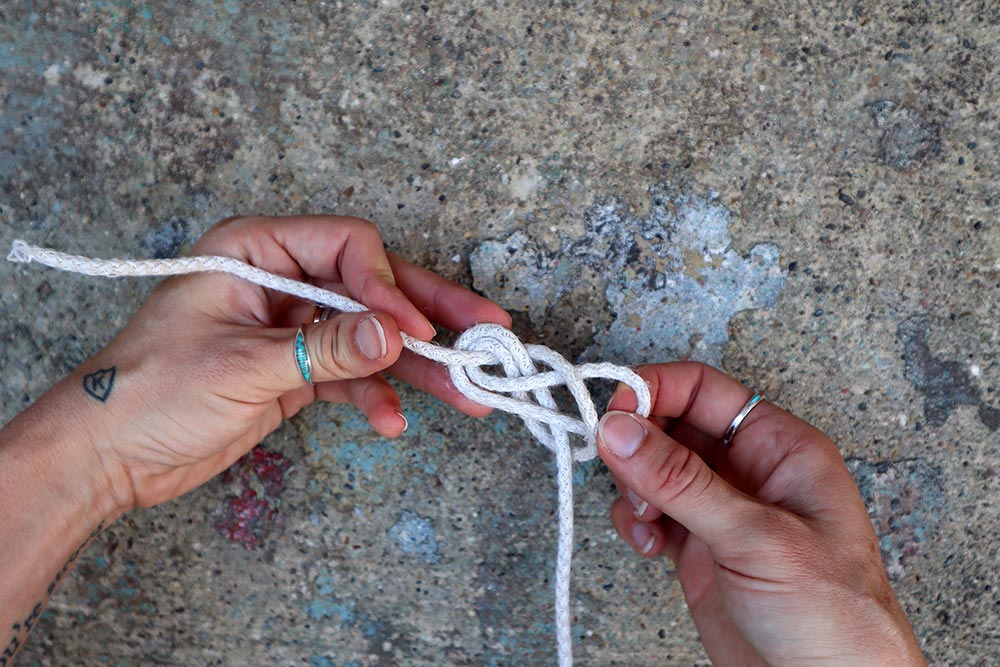
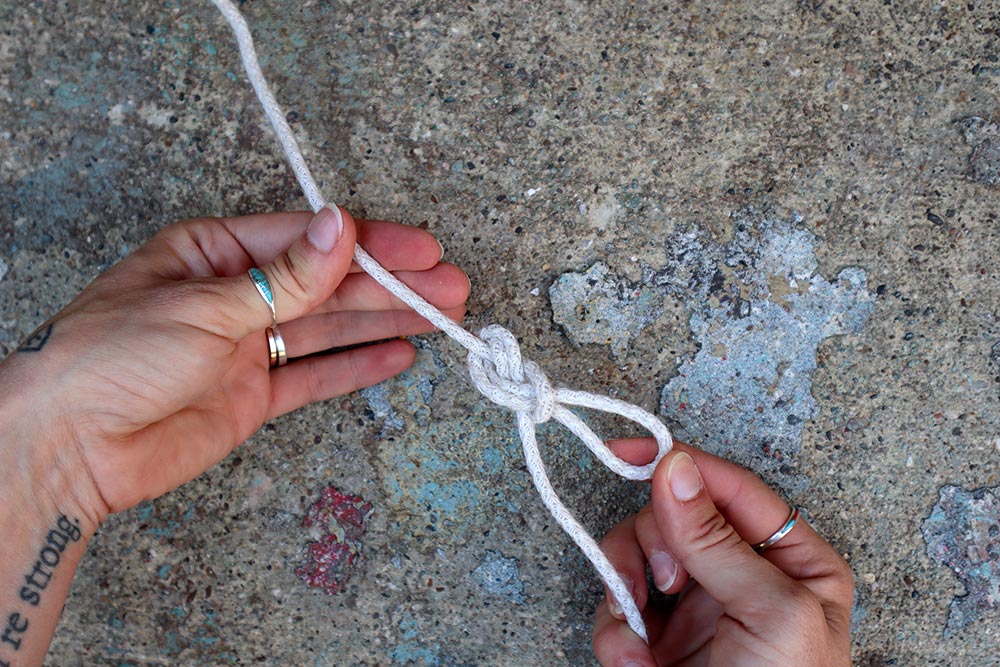
BONUS: To tie a directional figure 8, you make a loop to form a P (working crossing over standing), then elongate that loop away from you, pinching on the cross point. With your left hand, take that elongated loop beneath the standing end and hold. Still pinching the cross point with your right hand, twist the rope toward you once. Next, bring the elongated loop up and then down through the lower pinched loop and pull it through. You should now have a small loop that’s secure on the line.
4 SHEET BEND
Also known as a weaver’s knot or weaver’s hitch, the sheet bend is used for joining two lines of differing rigidity or diameter together. It’s structurally similar to a bowline, and also like a bowline, its downside is that it can come undone if it’s not under tension or bearing weight. The sheet bend can also be used to make the joints in a net.
Why
Use a sheet bend if you’ve run out of rope when securing a tent’s guy line and only have a skinnier paracord left to extend the line, or similarly, if you’re running a clothesline at camp and need more length. If your original line is thicker and all you have is a slim shoelace to extend the line, the sheet bend will work even better.
How
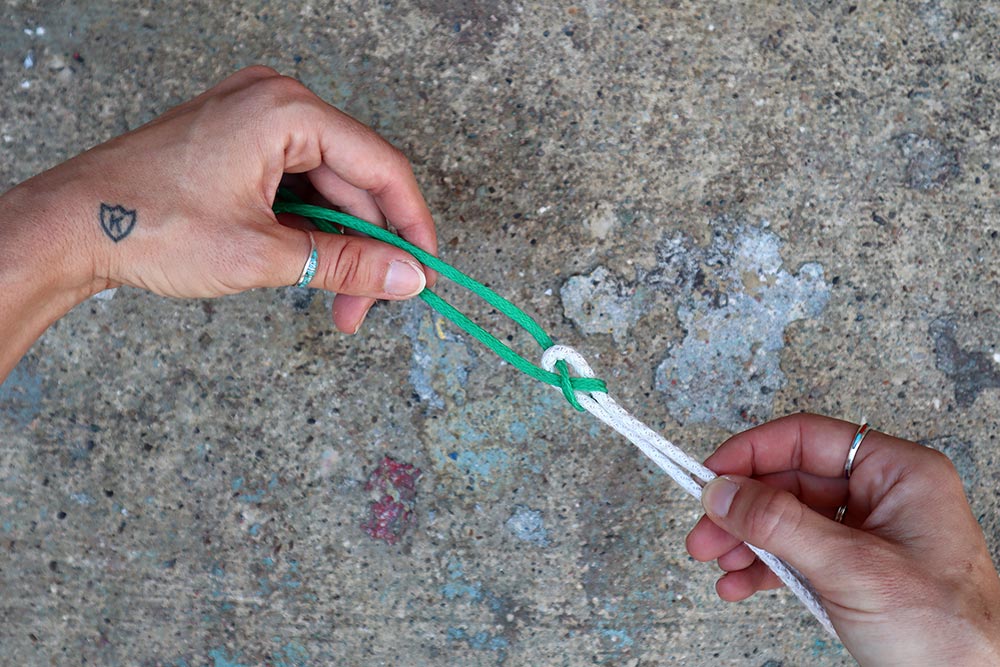
Step 1: Take the end of your thicker line and make a bight (or U-shaped bend). Leave just enough tail at the end.
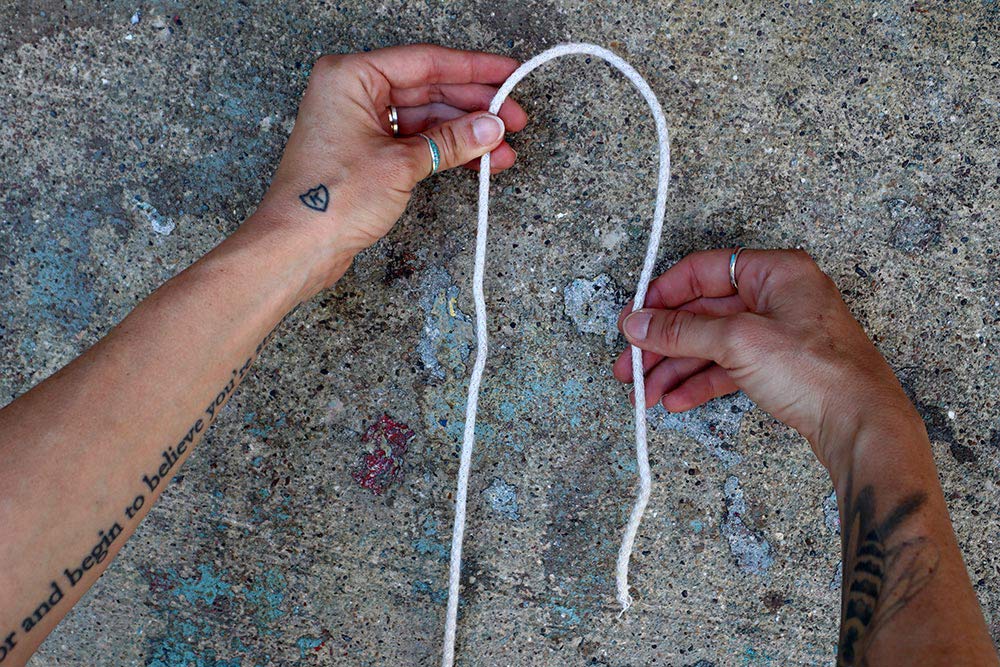
Step 2: Take the working end of your skinnier line and bring it up into the bight from below.
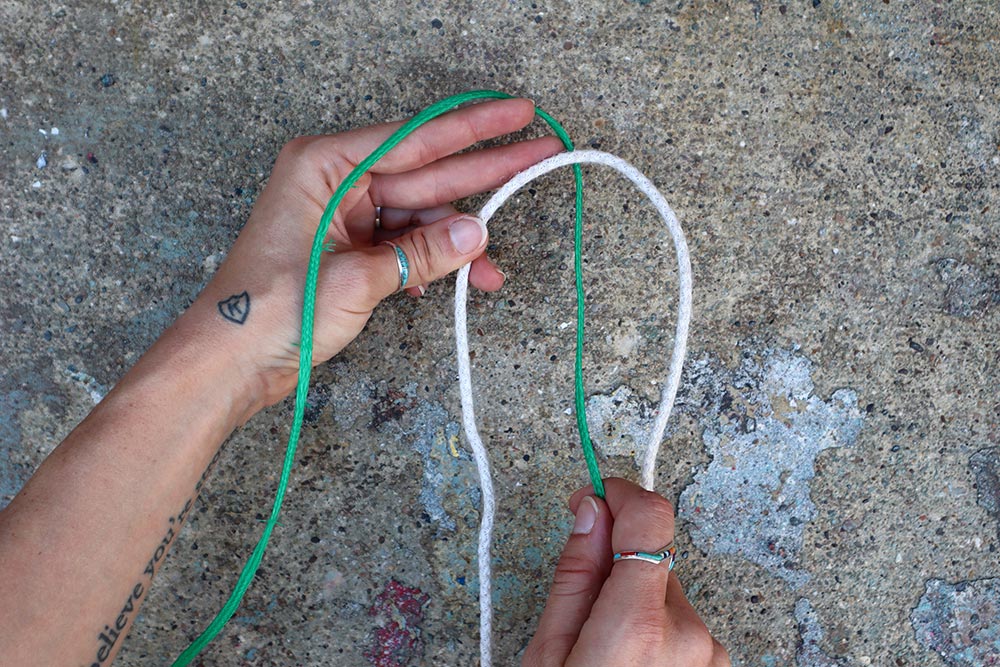
Step 3: Wrap the skinny working end around the thicker line, crossing over the top of it, then take it behind the two thick lines of the bight.
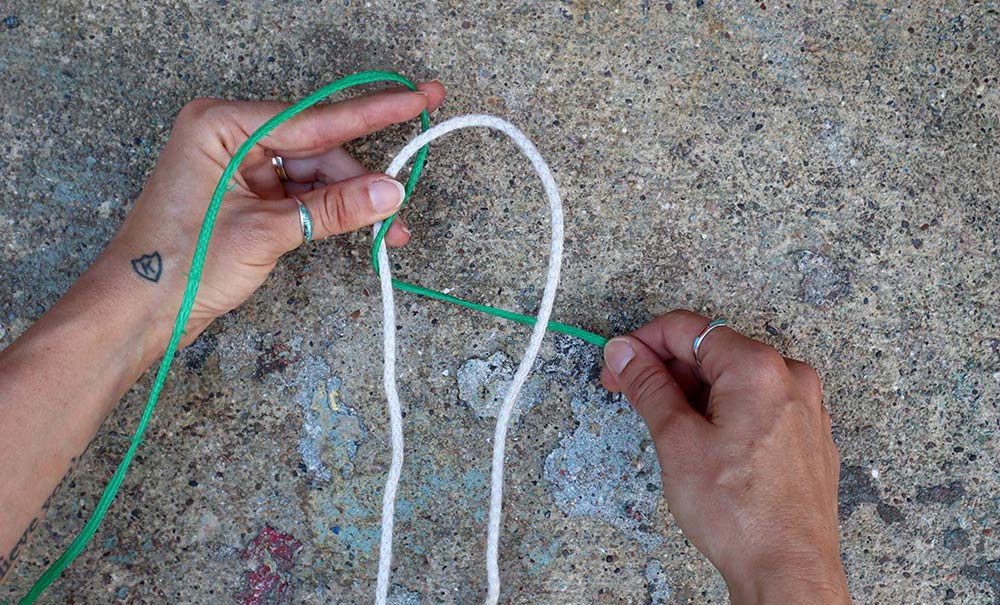
Step 4: Bring that skinny working end around to the front and cross over that closest thick line, then thread it under itself (the skinny line around in the bight) and up over the other thick line.
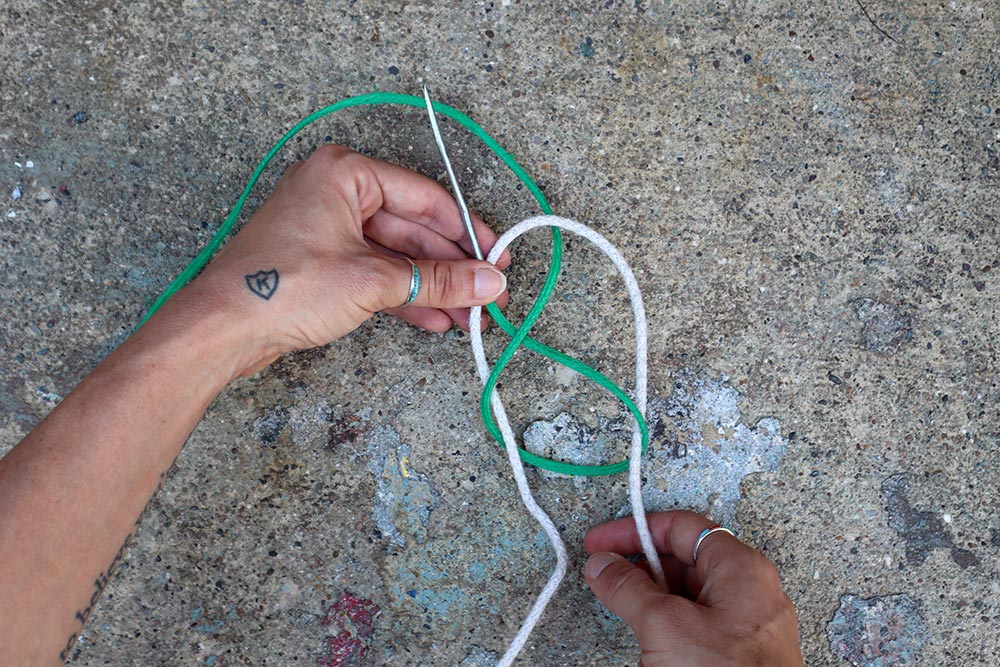
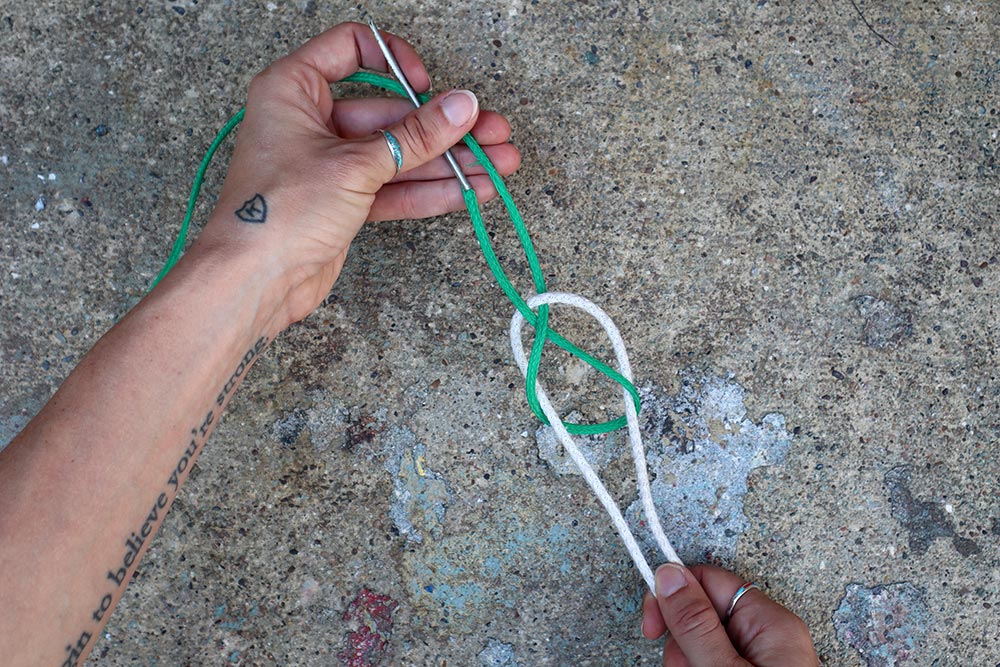
Step 5: Hold onto the bight with one hand and with the other, pinch the skinny lines together. Pull on the skinny lines to tighten the knot.
5 SQUARE
The square knot is also known as a reef knot, as it has been used by sailors for reefing sails (basically making them smaller). It’s a nifty knot to know (say that 10 times fast) for easily securing things. You may recognize it from tying your shoelaces (“right over left, left over right”). Just don’t use a square knot to bear loads, for joining lines together or for anything super important (like when safety is a priority). And don’t finish with a “right over left,” or you’ll end up with an inferior granny knot.
Why
Square knots are quick-and-dirty knots for securing things together. You could use them to bundle firewood together, tie your shoelaces or tie on a bandage or tourniquet out in the field.
How
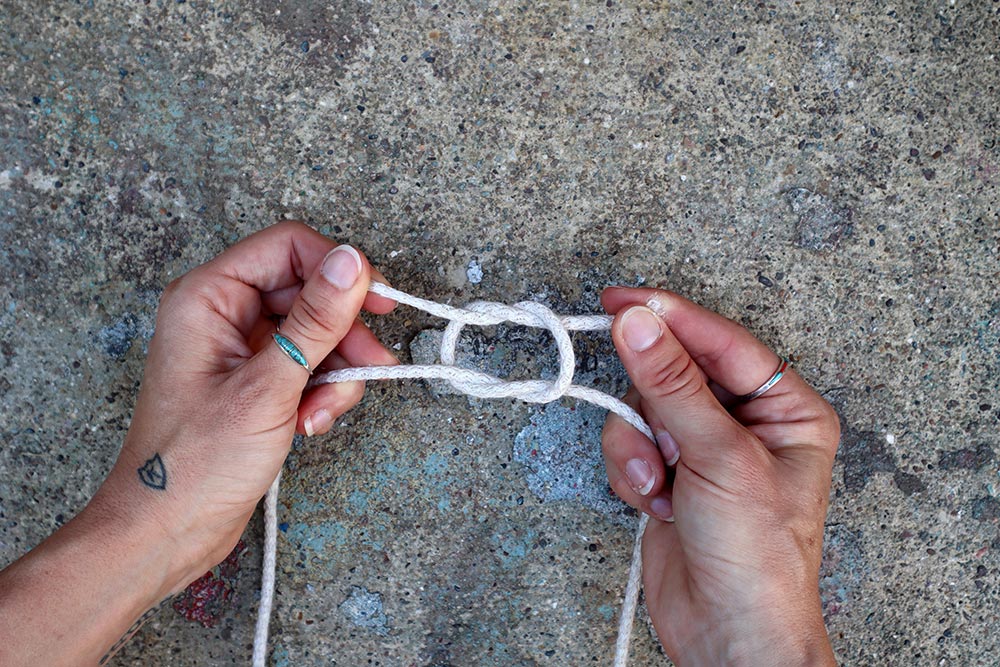
Step 1: You will start with one length of line, an end in each hand. Take the left end and cross over the right.
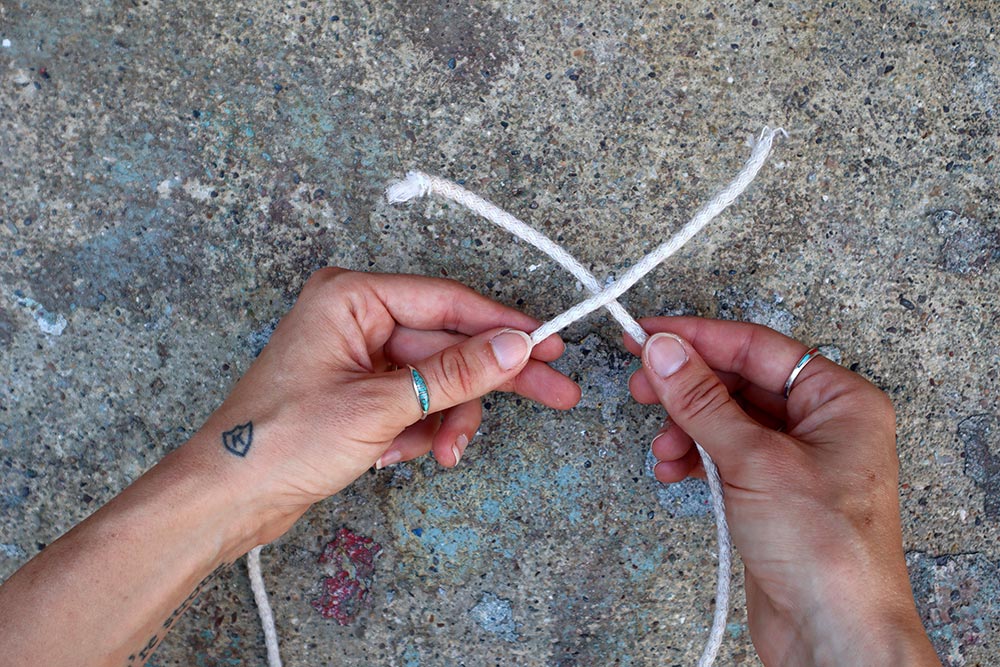
Step 2: Take that left end to the right and under the other end of the rope, forming two X’s.
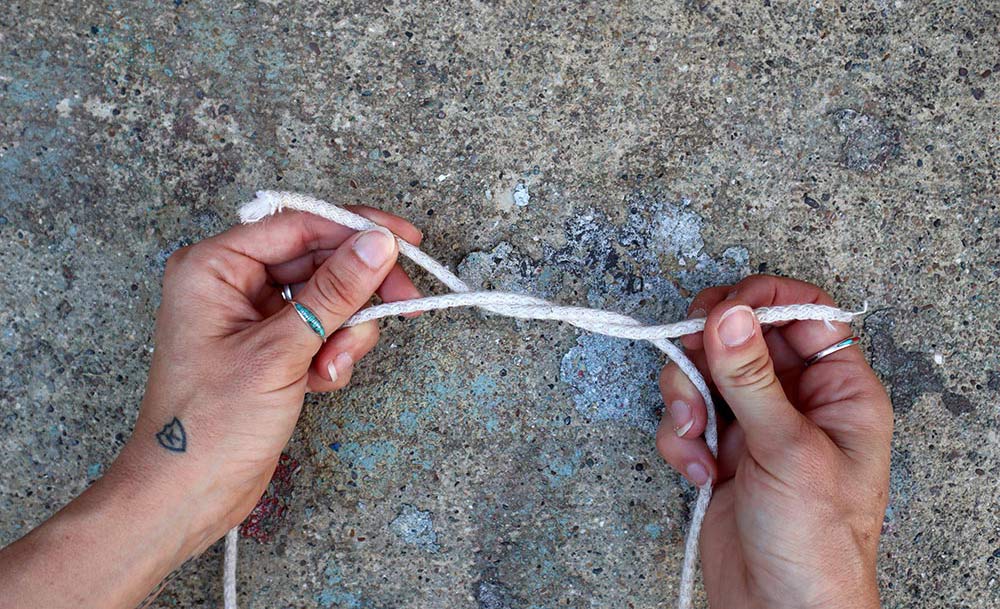
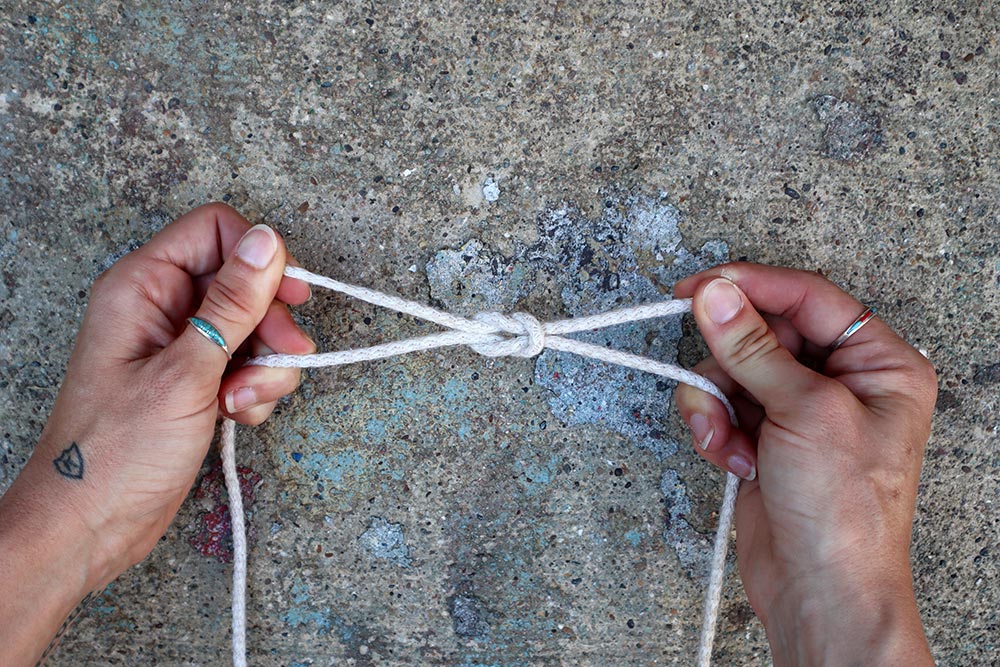
Step 3: Continue pulling up on that same end of rope (it’s now the right rope end) and bring it up over the left end, wrapping it around it.
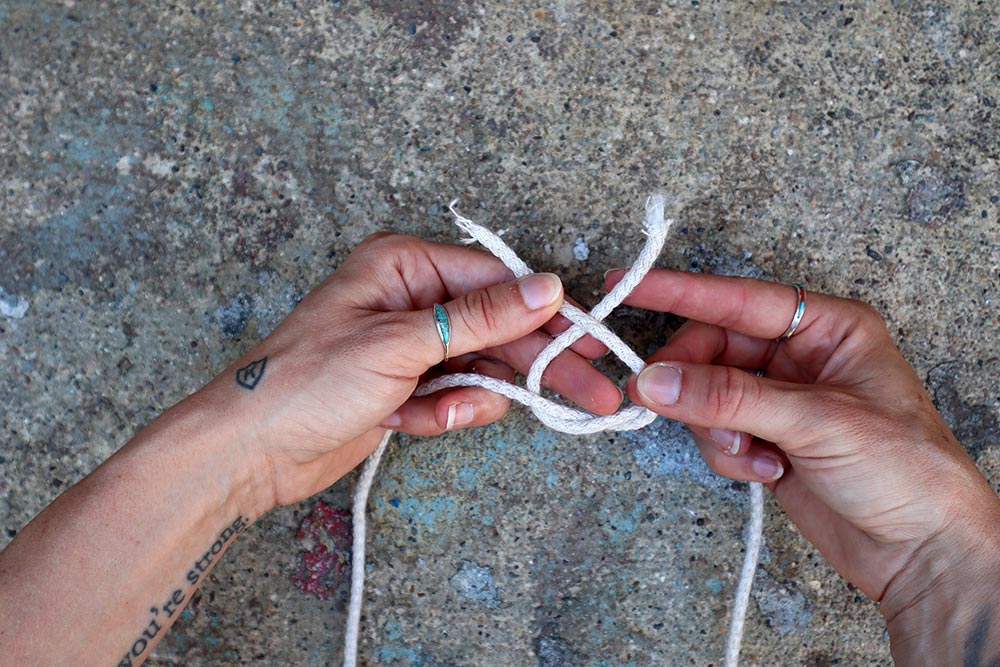
Step 4: Pull tight on all four lines and your square knot will shrink and cinch in tight.
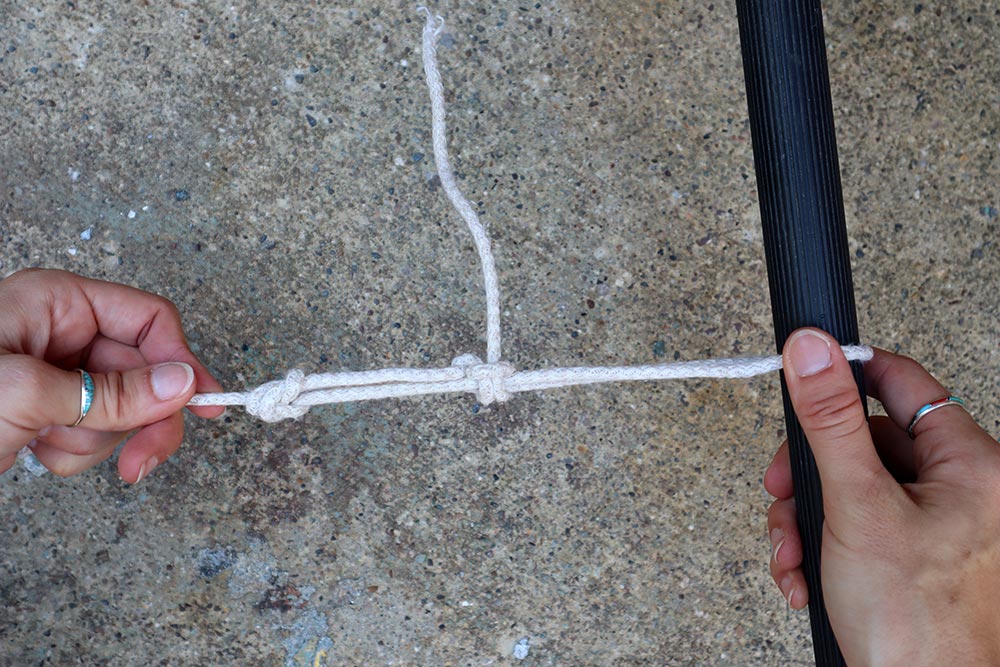
6 TRUCKER’S HITCH
Here’s the tough guy of knots. The trucker’s hitch is an extremely popular and effective knot and has myriad uses, namely those that involve tying down large, heavy objects. To master this one, you’ll need to already know how to tie a directional figure-8 knot.
Why
Employ the trucker’s hitch whenever you need to add extra tension to a line, like when it’s really windy and you need to batten down the hatches and secure your tent guy lines or tarp. A trucker’s hitch will give you more mechanical advantage than just pulling tight on a rope yourself. You can also use it to secure gear and firewood.
How
Step 1: Tie off one end of the rope to an anchor point (like the rail on a trailer, a tree, a tent stake or whatever you’re securing your load to). You could use a bowline or another sturdy, load-bearing knot.
Create a directional figure-8 knot about 2 feet away from the load you want to secure (see the Figure 8 section above).
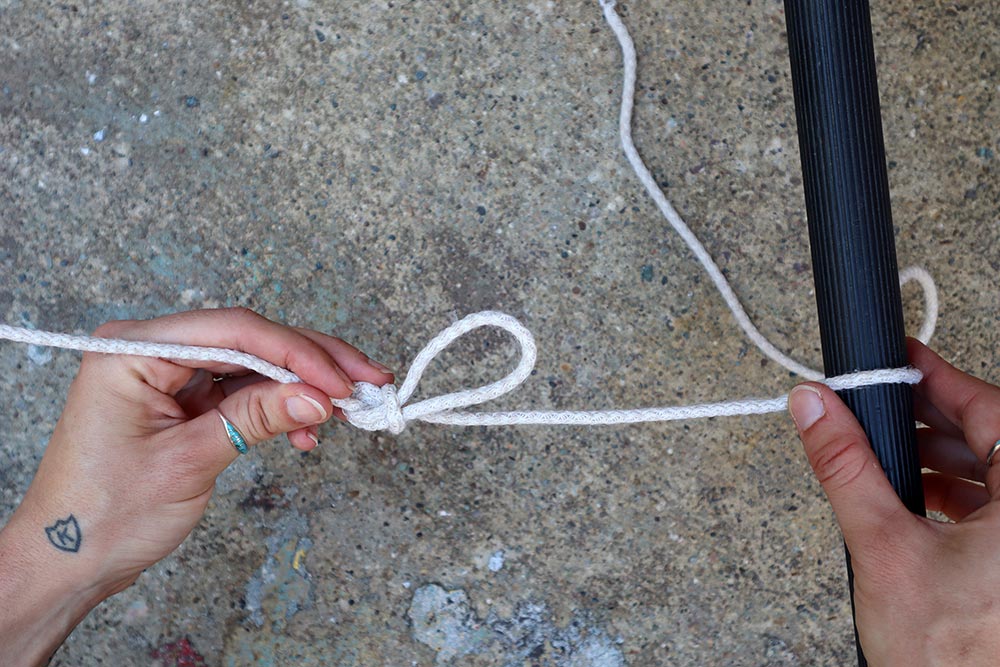
Step 2: Take the working end of the rope and wrap it around/through another anchor point on the other side of the load (so that you’re tying down that load) and bring it back toward the figure-8 knot you made.
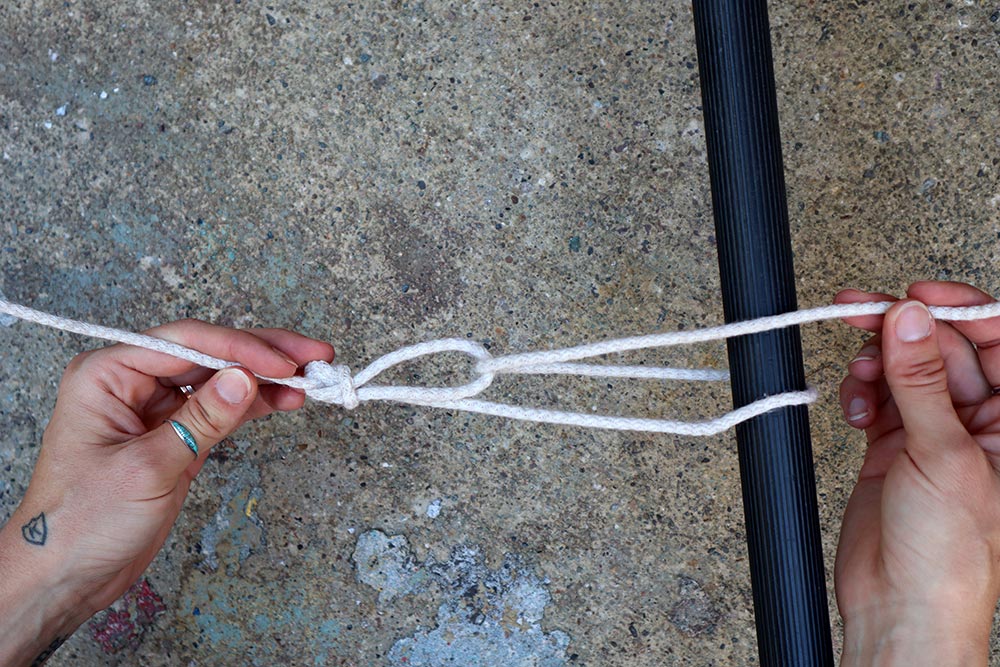
Step 3: Thread the working end through the loop you made with the figure-8 knot and using it as a pulley, pull it taut, tightening it down over the load or creating tension between both anchor points.
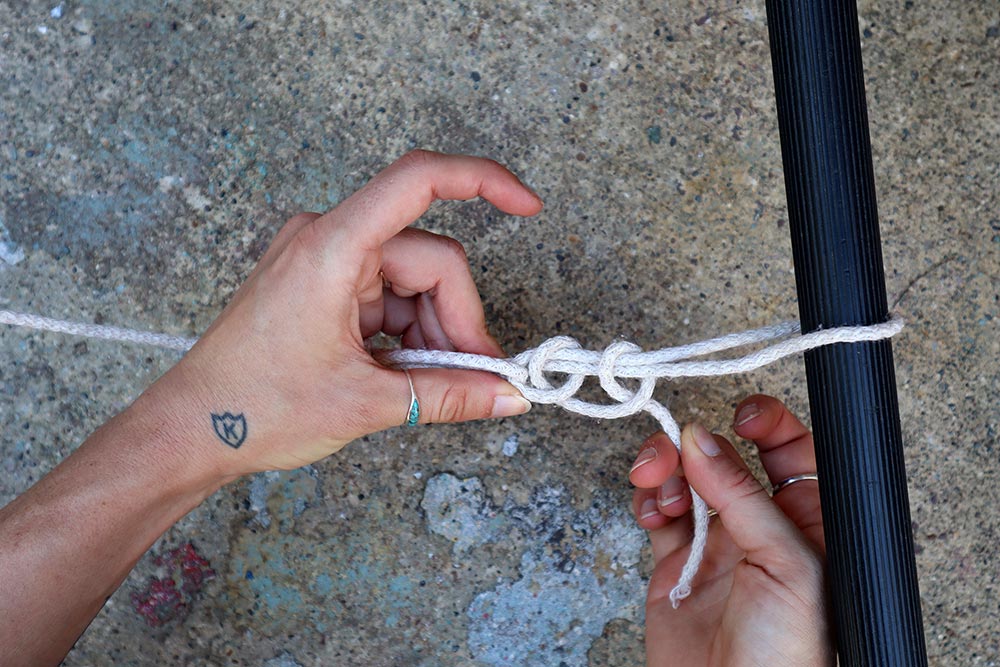
Step 4: With a hand, clamp down on the figure 8 and all the ropes and tie two half hitches by bringing the working end down beneath all the ropes and then through itself. Repeat that once more and tighten.
